Introduction and Preliminary Requirements
To make calls to external numbers, the 3CX system needs to connect to at least one SIP trunk / VoIP provider or VoIP gateway. VoIP/SIP providers (telecommunications operators) provide virtual (logical) telephone numbers that replace physical lines of a traditional telecommunications operator. VoIP operators can offer local numbers in different cities and countries that will be connected to your PBX.
Important! For locally installed or hosted on your hosting, you need to perform a network firewall check! For correct network firewall configuration, see Network Firewall Configuration Guides.
Step 1: Register an Account with a Supported VoIP Provider
First, purchase a trunk/number from a VoIP provider in your country. It is desirable that it is officially supported by the 3CX system. In this case, 3CX provides a ready-made configuration template for it, which is automatically updated when there are changes in the provider’s parameters or in the 3CX system.
Step 2: Add the VoIP Operator Account to 3CX
After receiving the account parameters from the VoIP operator, connect it to 3CX:
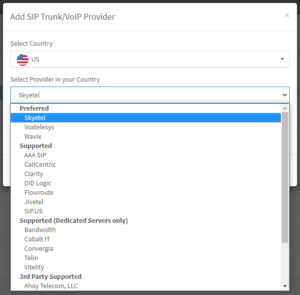
- In the 3CX management interface, select “SIP Trunks” > “Add SIP Trunk.”
- Select the country where the VoIP operator operates.
- Enter the main SIP trunk number. Pay attention to the number format. Sometimes numbers need to be specified in e164 format (for example, +12015353637), but it’s better to clarify this with the operator’s support.
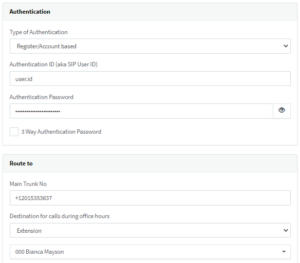
- Enter the authentication ID and password provided by the provider after signing the contract.
- Add the DID numbers assigned by the operator to this trunk. Go to the “DIDs” tab and use “Add Single DID” to add numbers. By default, calls to these numbers are directed to the operator’s extension number. You can redirect them in a different direction by creating an incoming rule for DID in the “Incoming Rules” section.
- On the “Caller ID” tab, specify the trunk number (Caller ID) that will be displayed when calling the subscriber.
- Click “OK” to save the trunk settings.
Step 3: Configure SMS / MMS (Optional)
This feature is most in demand among American and Canadian users. In the USA, DID numbers can by default receive and send SMS. Your SIP trunk can also be configured to work with SMS:
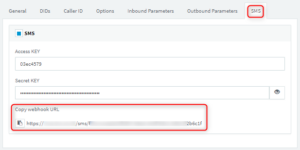
- Go to the “SMS” tab and enable SMS support.
- Obtain Access Key and Secret Key from your VoIP provider portal. Enter them in the 3CX interface.
- 3CX generates a webhook URL.
- Go to your provider’s portal and insert the webhook as indicated in the setup guide of the respective provider: Setup.
- Bandwidth
- Flowroute
- VoxTelesys
- Supported by the provider itself – Telnyx, Twilio
- Additional guides are available on the SIP Providers page.
- Now specify where incoming SMS messages will be delivered:
- StartUP: SMS messages are delivered according to the route specified in “Office settings” > “Call routing”. If this trunk has an additional different DID, click the “+ Add DID” button in the “Voice & chat” section.
- Dedicated (PRO & ENT):
- If your trunk has a single number, go to the “General” tab, “Route to” section, and select an option from the dropdown. SMS messages can be delivered to an individual user, group, or queue.
- If the SIP trunk has multiple numbers, go to the “DIDs” tab and specify them. Then go to the “Inbound Rules” section in the left menu, click “+ Add DID Rule”, and set up routing for each number.
- Enable users to work with SMS (SMS work is disabled by default):
- StartUP: In the web client, go to “Office Settings” > “Users” and select the user. In the “Messaging” section, select the created SIP trunk from the dropdown. Then click “Save”.
- Dedicated (PRO & ENT): In the management interface, go to the “Users” section and select the user. On the “General” tab, go to the “Enable SMS” section. Enable the option and select the created SIP trunk from the dropdown. Then click “OK”.
Step 4: Create Outbound Rule for Calls through Trunk
Outbound rules specify the direction (SIP trunk or VoIP gateway) through which outbound calls should be routed. The direction is selected depending on which user or group makes the call; the dialed number (prefix) or length of the number. To make calls to external subscribers through 3CX, you need to create at least one outbound rule.
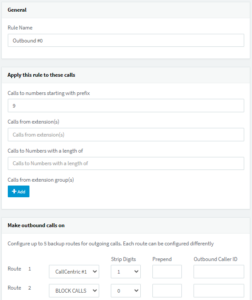
To create an outbound rule in the 3CX interface and specify for which calls it should apply:
- In the 3CX management interface, go to “Outbound Rules”, click “Add”, and specify the name of the new rule.
- In the “Apply this rule to these calls” section, specify the criteria for when this rule should trigger:
- Calls to numbers starting with prefix – Apply the rule to all calls starting with the specified digits. For example, prefix 9 includes the rule for all outgoing calls whose numbers start with “9”.
- Calls from extension(s) – Apply the rule to the specified extensions or range of extensions. Specify numbers separated by commas or blocks separated by dashes, for example, 100, 102-120.
- Calls to Numbers with a length of – Apply the rule to numbers of a certain length. For example, length 8 includes the rule for all local calls (with 8-digit numbers). Now users don’t need to dial a prefix for local calls.
- Calls from extension group – Apply the rule to a group (or groups) of extensions.
- “Make outbound calls on” – You can specify up to five trunks or gateways through which the call will be routed. If the first trunk in the list is unavailable or busy, 3CX automatically routes the call through alternative routes. All routes will be sequentially selected until successful connection or reaching the “Block Calls” route.
- The number corresponding to the outbound rule can be modified before being passed to the SIP operator or VoIP gateway. The following parameters are used for this:
- Strip digits – Remove one or more digits from the beginning of the number. For example, you can remove 1 digit “9” to send the number to the gateway without a prefix.
- Prepend – Add one or more digits to the beginning of the number. For example, you can add the prefix “2” to make the call from a specific port of the gateway.
- Click “OK” to save the outbound rule.
| Order 3CX setup from specialists