Step 1 – Launching the PBX Initial Setup Wizard
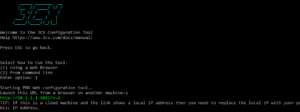
After installing 3CX, the Initial Setup Wizard (3CX PBX Web Configuration Tool) will request important network and security parameters necessary for the correct setup of the server. To launch the Wizard, enter the IP address of the 3CX server and port number 5015 in your browser (for example, http://10.172.1.88:5015). You can also run the Wizard in the 3CX server command line (option 2). The Wizard will guide you through several sections.
Step 2 – New Installation or Restoration, Administrator Data, IP Address Type
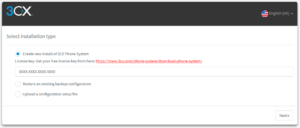
- Select the installation type and click “Next”:
- “New install” (“Create a new PBX”) – if you are just starting with 3CX and do not have a license key, go to the provided link, create a 3CX account, and obtain a license key. Copy and paste the key into the field below the link.
- “Restore existing backup” (“Restore an existing PBX configuration from a backup”) – click the “Upload” button and select the 3CX system backup file. If the backup does not include license information, you will need to specify the license key.
- “Upload a configuration setup file” (“Upload a configuration setup file”) – click the “Upload” button and select the 3CX automated setup XML file.
- Provide secure (case-sensitive) 3CX management interface access credentials. A complex password will prevent unauthorized access to the PBX. Then click “Next”.
- Confirm your public IP address. Enter “Yes” to confirm the current address or “No” to specify another address. If your network routes HTTP traffic through a separate external interface, ensure you specify the correct public address of the 3CX server. Click “Next”.
- Specify whether you use a static or dynamic IP address. For corporate use, only a static, unchanging address is recommended. For testing or home use, a dynamic IP address is suitable. Although 3CX automatically detects IP address changes and updates the DNS (FQDN server), incoming calls will not work until the update is completed. Click “Next”.
Step 3 – Choose an FQDN
- The 3CX server requires an FQDN (Fully Qualified Domain Name) that is equally accessible from both the local and public networks. For this domain name, a trusted SSL security certificate must be generated. With an FQDN and SSL certificate, users can securely connect to the server from both the company’s local network and anywhere in the world. Choose an FQDN, and 3CX will configure it for you automatically. Note: The selected FQDN (subdomain) will be tied to your license key.
Step 4 – Specify DNS Type and Ports
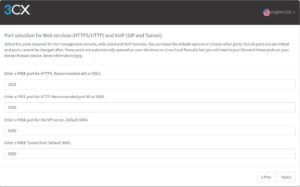
- Specify the HTTP and HTTPS connection ports to the 3CX management interface and the VoIP service ports (SIP and 3CX Tunnel). Based on the IP address of the 3CX network interface, it will automatically detect whether you are using NAT. If the server is behind NAT, you must correctly configure your network firewall or router.
- Specify the network interface through which the system communicates with the Internet (or which has a public IP address), and on which the default route is specified. If the 3CX server has local (LAN) and public (WAN) interfaces, and users connect inside and outside the network, specify the local interface without a default gateway. Then go to the 3CX interface section “Settings” > “Network” > tab “Public IP” > section “Network Card Interface” and specify your public IP address. Then an FQDN and SSL certificate will be generated. The certificate is obtained from the Let’s Encrypt service and installed on the 3CX server.
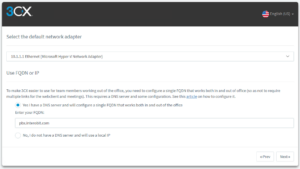
- Indicate whether you have a DNS server that you can manage (add records to), for example, a Windows Server with DNS service. Then click “Next”.
- Yes, I have a DNS server and will configure a single FQDN that works both inside the local network and outside (I manage a DNS server and want to use a unified FQDN both within the local network and outside) – in this case, it is recommended to use a single shared FQDN, for example, “mycompany.3cx.eu”. This name should resolve to the local IP address of the PBX server within the local network and to the public IP address of the server on the Internet. Refer to the guide Creating an FQDN using Split DNS.
- No, I do not manage a DNS server and will use a local IP (I do not manage my DNS server and want to use an IP address within the local network and an FQDN outside) – for example, pbx.interobit.com as an external FQDN and pbx.interobit.local (or 192.168.0.1) – as internal. If you cannot change the internal DNS, specify a separate external FQDN for devices connecting via the Internet, and a local IP address (or local name) for devices in the local network.
Step 5 – Other Parameters
- Extension Length – (Extension Number Length) – specify the number of digits in the extension number. Plan the required length of the number well, as it cannot be changed later without a complete system reinstallation. Click “Next”.
- Administrator Email – (Administrator Email) – specify the email address of the system administrator to which various notifications will be sent. Click “Next”.
- Country and Time Zone (Region and Time Zone) – specify your country and time zone. Click “Next”.
- Operator & Voicemail Extensions – specify the name and email address of the PBX Operator – the user (extension number) to whom incoming calls will be directed by default. Also, specify the system voice menu/voicemail number (“Operator & Voicemail Extension”). When calling this number, users will be able to listen to messages left for them. Click “Next”.
- Countries calls can be made to (Allow calls to) – specify the countries to which calls will be allowed through your system. This security measure reduces the risk of losses from telephone fraud. Click “Next”.
- Select Language – 3CX comes with a pre-installed English US language menu. The system voice menu is a set of pre-recorded messages that 3CX plays to external callers or internal users when they use PBX features. You can choose the desired language for the voice menu from the drop-down list.
The Initial Setup Wizard requires some time to configure and launch 3CX services. After that, a page with summary information about the system parameters will appear. This same information is sent to the email of the system administrator. Now you can connect to the 3CX management interface.
| Order 3CX setup from specialists